Showing posts with label coils. Show all posts

Sunday, April 5, 2015

BAJELE AL BOOM - Car Audio & Electronics Magazine en Español

Picture of Alberto A Lopez and his award winning Sentra
In 1992, Car Audio Magazine launched its first Spanish edition. Coincidentally, my car was featured in it. Years later, when I worked in Mexico as a consultant, retailers were eager to show me the magazine. So one could safely conclude that the Spanish version was better received than those in the US would have thought. This leaves us with the question of why the translation services did not continue.
Perhaps one reason was that the translation was generally substandard. This comes from the fact that translation services often lack the insight needed to convey conversations fluidly withing highly technical industries like this one.
Whatever the reason, I remain ecstatic to have been so lucky. So, let me share the transcript of the Spanish version of the article originally written by Edwige Grimes and photographed by Bobbi Lane:


Composite image of Alberto A Lopez Sentra's trunk with and without stealth covers
Construyendo un piso falso y los paneles para el sonido (abajo),
López mantuvo la mayoría del espacio en el portaequipaje (arriba).
BAJELE AL BOOM
El instalador Alberto López aprendió que sonidos fuertes no significan mejor.
POR EDWIGE GRIMES / FOTOGRAFIA: BOBBI LANE

Alberto López fue expuesto por primera vez a car audio de alto nivel en pruebas de sonido en Texas en el año de 186. Inmediatamente, encontró un nuevo hobby. "Yo nunca había visto algo como esto," dice el instalador, de 25 años de edad, de Inphase Car Audio en Omaha, Nebraska. 
Alberto admite, "en Mexico no tenemos nada como esto. Yo quede impresionado. Por supuesto lo que me atrajo al principio fueron los carros boom."
Loopez aprendio rapidamente que los sonidos fuertes no son siempre lo mejor. El primer sistema de sonido en su Sentra de 1989 fue disenado primeramente para cantidad de sonido. 
Alberto dice, "pero usted se cansa de sonidos fuertes." "Mis oídos me dolieron en una ocasión, y después en otra ocasión, entonces yo empecé a preocuparme acerca de la situación."
Compitiendo en pruebas de sonido lo apuraron a modificar el sistema de sonido. Alberto dice "yo empecé a aprender más y empecé a ser menos y menos ruidoso. Ya no es cosa de ruido fuerte para nada."
López es estudiante de negocios en la Universidad de Nebraska en Omaha. El aprendió instalaciones y diseño de sistemas ablando con la gente que el pudiera, e inspeccionando vehículos en competencias de sonido. Los conocimientos de física y arquitectura de sus estudios universitarios en su nativo México también son una gran ayuda.

picture of the door in Alberto A Lopez's competition Sentra
López reconstruyo los paneles de las puertas cubriéndolas con un paño
de lana y un vinilo gris. Cada puerta tiene un woofer de 8 pulgadas.
Empezando Sin Nada
La conquista de López para mejorar la calidad de sonido empezó con la modificación de las bocinas de acuerdo con sus necesidades. 
Cada puerta tiene los woofers Morel MW-224 8 pulgadas. López trato el cono de los woofers cubriéndolos con cerámica para alterar el sonido. El explica "el peso del cono es diferente y toda la proporción de las bocinas es diferente."
López reconstruyo completamente los paneles de la puerta, cubiertas en paño de lana y vinilo gris que hacen juego con el interior de cuero del Sentra, rejas metálicas para las bocinas cubiertas con una tela transparente sobre el woofer para su protección. 
picture of rear deck in Alberto A Lopez's competition Sentra
Las redes pasivas de crossover para las bocinas
en las puertas fueron montadas en la cubierta de
atrás (abajo) y cubiertas con rejas (arriba).
De acuerdo a López agregando redes crossover hechos a la medida también ayudo a mejorar el sonido de los woofers. "El woofer era muy bueno con las voces, pero era un poco débil en el medio bajo y [las redes] lo convirtieron en un sonido suave, y picante - bueno para el medio bajo con suaves ondas saliendo a medio alcance."
López construyo la red de crossover por su propia cuenta y los monto en la cubierta de atrás. Primero el corto orificios en la cubierta lo suficientemente grandes para las redes. Después, él diseñó un panel de tabla de madera que encajan debajo de la cubierta y refuerzan la fibra de vidrio. Entonces el monto las redes al panel y las cubrió con las verjas de las bocinas que hacen juego con las verjas de las bocinas en las puertas. Como toque final, la cubierta de atrás fue forrada con el mismo material que se uso para los paneles de las puertas. 

Bocinas en el Piso
López decidió experimentar con bocinas montadas al nivel de los pies en su vehículo. El dice, "yo sabía del concepto, pero yo no sabía porque trabajaba o como trabajaba."
picture of the kick panels in Alberto A Lopez's competition Sentra
Caparazón construido a la medida para
cada panel contiene un tweeter de 4
pulgadas, medio alcance y 0.75 pulgadas.
Los tweeters, Cabasse MD-100 4 pulgadas medio alcance y DOM-4 .075 en bocinas hechos a la medida con caparazón unidos al panel del piso. La parte de atrás de cada caparazón y el panel del piso detrás de este, fueron cortados para acomodar el magneto grande del tweeter, que López comparo al el magneto de la bocina de 5.25 pulgadas. El remarca "Esto es algo masivo."
Las bocinas del bafle fueron pintadas con pintura FleckStone gris, y los caparazones fueron cubiertos con vinilo. Verjas como en las bocinas de las puertas con tela sobre el caparazón para proteger los conos de las bocinas. 
Yo empecé a experimentar con sonido allá," dice López refiriéndose a las bocinas en el panel del piso, además el trato diferentes ángulos y crossover de redes hasta que encontró la combinación que funcionó. 
picture of chair mounted passive crossovers in Alberto A Lopez's competition Sentra
Un lugar no muy común para poner
los crossover pasivos. Bolsas pequeñas
con cremalleras en las sillas contienen
redes pasivas crossover para los
paneles de las bocinas en el piso.
Las redes pasivas de crossover a la medida para las bocinas en los paneles del piso están localizadas en una caja de madera instalada dentro de las sillas de adelante. La mayoría de la espuma en el interior y las varillas de soporte fueron removidas para instalar los crossovers, explico López. 
"Esta en su espalada, pero no los puede sentir," el dijo, explicando que los crossovers fueron montados en varillas flexibles dentro de las sillas. "Los crossover están suspendidos de tal manera que cuando uno se sienta, usted los empuja de una manera que giran de allá para acá." Cubiertas de plexiglas protegen las redes, que se encuentran escondidas de bajo de una pequena bolsa con cremallera cocida en la parte de atrás de las sillas. 
Cada panel tiene en la parte de atrás un woofer Peerless P-228 de 8 pulgadas montado dentro de un paquete de fibra de vidrio hecho a la medida. Los paneles que esconden estas bocinas no se pueden remover. 

picture of aperiodic subwoofer box in Alberto A Lopez's competition Sentra
Caja que se puede ver através debajo de la cubierta de atrás
contiene dos subwoofers Dunaudio de 12 pulgadas.
Esquema del Portaequipaje
López diseñó el esquema de los componentes en el portaequipaje con conservación de espacio y utilidad en la mente. El indica, "mi portaequipaje tiene mas o menos un 90% de espacio para cargo."
El empezó construyendo y diseñando un empaque para subwoofer que encajara debajo de la cubierta de atrás. El empaque, construido de tabla de madera de 15 pulgadas, tiene dos subwoofers Dynaudio 30W100 de 12 pulgadas. El lado del empaque mirando hacia el portaequipaje fue encajado con una ventana visible de plexiglas. Puertos de membrana en los lados permiten que el woofer "respire" de acuerdo a López. También, la superficie interior del empaque fue forrada en cuero con el mismo material que se uso para el interior.

picture of amp rack in Alberto A Lopez's competition Sentra
Piso falso en el portaequipaje tiene
amplificador, equalizador y bloque de fusibles.
El panel e la pared derecha del portaequipaje
tiene una caja para los capacitores.
Paneles de Portaequipaje Pintados
Se fabrico un piso falso de residuos de madera que encaja sobre el piso original del portaequipaje. Fue cubierto con el mismo material de paño de lana de interior. 
Dos amplificadores HiFonics Ulises están enterrados en el centro del piso falso, a cada lado. Arriba de ellos hay un equalizador Alesis MEQ-230 montado al mismo nivel del piso falso, y arriba del EQ hay una batería US Amps y fusible en bloque Sound Quest. Una pieza de plexiglass removible protege los componentes, y una alfombra cubre todo el piso. 
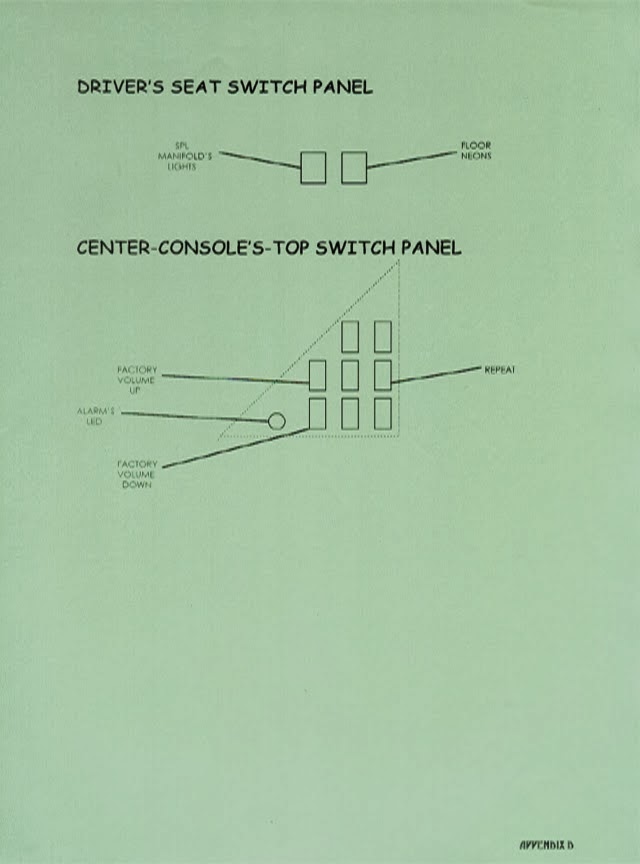
Un panel en la pared izquierda retiene un Audio Control Epicenter que fue pintado para que hiciera juego con el carro. "No salió tan bien como yo quería, pero está bastante similar," admitió López. También en este panel hay varios interruptores que controlan los aspectos del sistema. 
picture of custom epicenter in Alberto A Lopez's competition Sentra
La pared izquierda del
portaequipaje tiene el Epicenter
pintado a mano e interruptores.
Un panel similar en la pared derecha retiene capacitores Autosound 2000 Stiffening. López dice acerca de los capacitores "Me gusta cómo trabajan, refiriéndome al sonido." Para la protección de los dos paneles tiene una cubierta removible de plexiglass. López afirma "todos los bordes están pulidos incluso los pequeños orificios." Como toque final los paneles que cubren con el paño de lana encajan sobre el plexiglass.
López puso sus capacidades de pintor en el diagrama del sistema de sonido y la red de crossover en la cubierta del portaequipaje. Pequeños LED controlados con interruptores en la pared izquierda iluminan los diagramas. 
La cubierta motorizada del portaequipaje es controlada por el sistema de seguridad Clifford 600 con transmisor a control remoto. López escondió los activadores grandes construyendo unos paneles a su alrededor montados debajo de las bisagras del portaequipaje.

picture of Denon head unit in Alberto A Lopez's competition Sentra
No estos no son de fabrica. López hizo al
radio CD Denon parecer "Nissan."
El Sonido es lo Importante
Échele un vistazo a la unidad principal en el panel delantero, y usted creerá que Nissan a empezado a instalar equipos de sonido CD en todos los Sentras. Pero la etiqueta "Nissan" en la cubierta es solamente para cubrir lo que hay en realidad: un radio Cd convertido de pullout (empuje hacia fuera) en una montura permanente.
López dice "en casi todos los shows a los que voy los jueces me preguntan si ese es el radio que quiero usar." "Los jueces creen que es de la fabrica." Una pieza negra de plástico ABC retiene la unidad principal resaltando en el panel delantero. 
Varios botones fueron integrados en la consola del centro cerca del freno de mano para controlar las funciones del radio haciendo las operaciones mas fáciles y seguras. Los controles instalados de las ventanas también se encuentran en este lugar.
illustration of system diagram in Alberto A Lopez's competition Sentra
Diagrama del sistema.
Para mejorar el sistema eléctrico debajo del cofre delantero, López primero reemplazo la batería de fabrica por una más grande para complementar la batería U.S. Amps en el portaequipaje. Un insolador Sound Quest de 120 amperios separa las dos baterías. El alternador de fabrica fue reemplazado con un modelo de 120 amperios de Wrangler. 
López algunas veces se lamenta de que su hobby y profesión frecuentemente lo dejan corto de dinero, pero el dice que vale la pena. 
López dice "¿Sabe usted que es lo que yo disfruto más? El sonido." "Todas las dificultades por las que paso, todas las instalaciones, pero el sonido, eso es lo mas importante."


Image of Cover of Car Audio & Electronics Magazine Special Edition in Spanish
Cover
Car Audio & Electronics Magazine
Special Edition in Spanish
Image of Index of Car Audio & Electronics Magazine Special Edition in Spanish
Index
Car Audio & Electronics Magazine
Special Edition in Spanish

Image of Bajale al Boom Article - pages 48 and 49 - Car Audio & Electronics Magazine Special Edition in Spanish
Bajale al Boom Article
Pages 48 and 49
Car Audio & Electronics Magazine
Special Edition in Spanish


Image of Bajale al Boom Article - page 50 - Car Audio & Electronics Magazine Special Edition in Spanish
Image of Bajale al Boom Article
Page 50
Car Audio & Electronics Magazine
Special Edition in Spanish
Image of Bajale al Boom Article - page 52 - Car Audio & Electronics Magazine Special Edition in Spanish
Bajale al Boom Article
Page 52
Car Audio & Electronics Magazine
Special Edition in Spanish


Image of Bajale al Boom Article - page 54 - Car Audio & Electronics Magazine Special Edition in Spanish
Bajale al Boom Article
Page 54
Car Audio & Electronics Magazine
Special Edition in Spanish


Also, make sure to check the previous post on this vehicle:
What would you do after failing to build your small business ? I stood up and got to work.

Wednesday, February 12, 2014

Best Sound in a Vehicle - Part I - The Head Unit

Not just any head-unit
Photo Image of British van built by Paul Richardson and Alberto A Lopez
Click to launch installation video
To create the very best sound system, every part of the signal chain demands exceptional attention to detail. After years of progressive electronics improvements, I know that small changes aggregate in such a way that the resulting musical experience bears no resemblance to initial impressions from original equipment. This belief guided Paul and I as we went on to construct the best vehicle in the world. We started with the best equipment available at the time and modified it until it sounded better, was more reliable, became much more beautiful and was markedly easier to use. The following paragraphs describe the changes made to the system's head-unit.

Fujitsu Ten Head-unit
Everything started when we received a Fujitsu Ten head-unit for the van. In the US, Fujitsu Ten sold the same head unit under the Eclipse brand, which in 2010 went into bankruptcy.
Logo of Eclipse by Fujitsu Ten in black background
Back in 1996, the Japanese factory reverted to their proud corporate name for the European market. It had something to do with the fact that the word Ten means Heaven in Japanese.
Needless to say, everybody over there wanted American Eclipse head-units and hated the idea of owning a Fujitsu Ten. But I knew they were both made with the same exceptional quality. So, I had no problem using one as the starting point of our new source unit. After all, it was Fujitsu Ten who manufactured many of the best head-units at the time. 
Today, CD players use digital processors capable of much higher resolutions. But at the time, there was nothing better than the Eclipse... I mean Fujitsu Ten.

Transport
photo image with labels showing raw installation of British champion sound system built by Alberto A Lopez and Paul RichardsonThe truth is that Paul and I were mainly interested in the Eclipse's transport and D/A Converter. These were as good as there was at the time. Moreover, the areas of improvement that represented the low hanging fruiit where elsewhere. 
We knew that by reducing power source ripple and minimizing the transport's electric load, we could end up with a very good and stable digital unit. 
To reduce ripple noise, we used a very large capacitor/inductor network. An 8 AWG inductor is first placed in series with the load on the positive cable going to the head unit. Next, a large capacitor is wired in parallel running in between the positive and negative power cables. You then repeat the same inductor in series plus capacitor in parallel filter. While overkill, this setup proved quite effective at stiffening the head unit's power supply. 
To reduce the transport's electric load, we added a custom external power supply that drove an external pre-amplifier. The power supply was wired separate from the transport and had its own capacitor/inductor network.
After the modifications, the CD player lost all of its operating features. AM/FM radio, Volume, Balance, Fader and Tone controls were no longer active. In a nutshell, all that remained was the transport. All the duties of the Display, Controls, Volume and Output, were handled by separate devices placed elsewhere in the van. 

Photo image of center console inside the sound-off champion van built by Paul Richardson and Alberto A Lopez in 1996Center Console

The CD transport, the pre-amplifier and its power supply were installed within a new center console. Their 3" height determined the minimum internal dimensions possible for the console. Since we wanted the console to have the least effect over the sound of the floor speakers, we needed it to be very small. In the end, we made it about 3 3/4" high. 
After we finished, there was really nothing visible that would indicate that the electronics were contained within the unusually low console. There was only a very small slot facing the driver side.
Close up photo image of center console inside the sound-off champion van built by Paul Richardson and Alberto A Lopez in 1996A slot was precision cut out of a black acrylic layer. So, considering that the interior of the van was all black, it was difficult for anyone to know that the CD player was housed there. This was the maximum expression of a stealth installation. 
Despite the unusual nature of the location, CD's were surprisingly easy to insert without looking. The reality was that placing the transport there was ergonomically superior to the more common dashboard location. In any case, it was very cool to take a CD and insert it into the invisible slot. It was as if the discs magically disappeared within the center console.

Pre-amplifier
If there is something that we all learned from Richard Clark was the value of a constant high voltage output from a head unit. This allows the signal to display a much higher degree of immunity to induced noise than is normally the case. Furthermore, a constant signal level means that processors behave much more linearly than they would otherwise. On its own, music is very dynamic. This poses a massive challenge to any power supply. But if you then add a volume control, you ask for the impossible. The dynamic range and response speed of such supply would be unique to say the least. Without such demand, dynamics improve as the signal is pushed hard through signal processors. 
The preamplifier took the output directly from the OpAmp buffering the D/A converter located on the unit's transport circuit board. As it is normal for me, we changed the buffer from the piece of garbage use by Eclipse to a superb Burr Brown. At the time, Burr Brown was yet to be bought by Texas Instruments. With Analog Devices, they represented the highest standard in performance. In comparison to other OpAmps, Burr Browns were sweet, spacious and large. But don't ask me which one we used. I can honestly not remember. All I remember is that it operated with high bias and that it was orgasmic in the way it played music.
By using a very small high quality cable, we reduced the signal's path length and bypassed  all the unnecessary radio and preamp features offered by Eclipse. In other words, there were no Volume, Fader, Bass boost or other features that could distort the signal. The difference in sound when one does this is incredible. The degree of transparency achieved is much higher.
To create the preamplifier, we started with a Lanzar six channel line driver. We disconnected the internal power supply and connected the board to our new external +/- 15V regulated power supply sporting a very low output impedance. Then, the input and four of the outputs were removed. Finally, two single channel Burr Browns were used in place of two of the original dual channel OpAmps. This meant that we ended up with a true dual mono line driver. Our goal was to improve stereo separation. In high definition systems, better separation and symmetry result in solid imaging and an expansive stage.
We then cranked up the gain until the Burr Browns begged for mercy. The line run hot at all times. There was no attenuator at the head unit. Instead, we installed ALPS motorized attenuators after the processors and right before the amplifiers. With what I know now, I would have used a better volume control. The difference between the ALPS and the one I have in my system now is like night and day. The ALPS lacks transparency. Here, consider the fact that I paid about 40 times more to build my present volume pot than to buy the ALPS already made. So the comparison isn't fair.
Likewise, comparing the ALPS with pots commonly found in car audio equipment is like comparing an MP3 with a High Resolution signal. There is just no comparison. The ALPS is much better than regular car stuff. Several layers of grain were removed thanks to the ALPS.

Photo image of hidden head unit display inside the sound-off champion van built by Paul Richardson and Alberto A Lopez in 1996LCD Display
Can you imagine what it would be like to try to navigate CD tracks without a display. We took the front circuit board from the Eclipse unit and placed it behind a custom piece of sculpted acrylic in the upper center section of the dash. Because the acrylic piece was painted black from behind, the display was completely invisible when off. As the head unit was energized, the display would appear, seemingly out of nowhere. This perfectly matched the disappearing CD trick described above. 
photo of Eclipse head unit's front board with connecting wires coming out of it.Unfortunately, to simply wire the front circuit board that housed the display to the body of the CD player would result in failure. How do I know? Well, because we failed when we tried it. What happened was that the long cables acted as capacitors. So, after we would remotely activate the "track up" feature, for example, the stored capacitance would keep it on; thus stopping all other features from working. Incredibly, the cables held enough capacitive energy to last for quite a while. This meant that we had to use a different solution. Let's just say that we ended up using telecommunication micro-relays to make the controls work. 

Photo image of control panel inside the sound-off champion van built by Paul Richardson and Alberto A Lopez in 1996Control Panel
The one part of the head unit that users experience directly was the control panel. This one was located in the best ergonomic location possible. While seated, the vehicle's driver would just slowly rest his right arm and, where the hand landed, that was where the controls were. 
We created a durable membrane that was stretched inside of the panel's top lid. Behind it, an aluminum frame holding low-travel (0.5 mm) precision switches held the rest in place. By pressing the membrane over each of the illustrated button images, the switches below would be activated. Each of these switches would then control the micro relays located behind the display board. Then, the volume up and down switches controlled the motors of the attenuators located at the amplifiers.
Photo image of control panel being operatedIn this way, all volume, track and power on/off functions were centralized within easy reach of the users. This meant that a seating listener would insert the CD through the stealth slot near his knee. He would then operate the system through the control board while visually confirming everything through the display located just below his sight. When compared to other vehicles, the experience of listening to the van was indeed exceptional right from the moment the disc was inserted and the system turned on.

Photo image of ventilation system inside the sound-off champion van built by Paul Richardson and Alberto A Lopez in 1996
Ventilation System
Part to impress the judges and part to prevent any possible issues with heat, Paul and I created a ventilation system that would keep the transport, the power supply and the pre-amp running cool. We used very quiet fans that could be turned off during listening sessions. 


Fuse Protection
Finally, we had to have the best protection. While most sound-off competitors create installations without access to the radio's fuses, our van was designed to be much better. All fuses where placed right where the driver's left hand would hang when not holding the steering wheel. In this way, the van's conductor would have access to all components of the head unit without having to exit the vehicle. Everything was easily reachable from a comfortable sitting position. 

Ergonomics
Photo image of interior of sound-off champion van built by Paul Richardson and Alberto A Lopez in 1996And there was nothing as comfortable as seating in the van. We raised the floor to ensure maximum leg comfort. We selected firm, wide Recaro seats for the beast support. These seats were located very close to each other to improve speaker path length symmetry. Finally, all windows and windshield were darkened with 30% film. To me, there is nothing like the impression of peace and quiet that results from the psycho-acoustical response to darkness. Think of light as energy. Then think of this energy as noise that interferes with the music. Light energy is, after all, uncorrelated to music.

How does it compare?
While Pioneer had already created its fantastic ODR system by the time we built the van, business issues meant that we would not be able to use it in the UK. Nonetheless, I am comfortable stating that our final head unit largely outperformed even a hot-roded ODR. Chuck Barbosa used such ODR, modified with Burr Browns and superior components. But the musicality and the dynamics from our Eclipse unit were simply out of this world in comparison. The only feature where the ODR won hands down was in time compensation. The Eclipse didn't offer any. Thankfully, time compensation was not needed. Paul and I selected speaker locations with the longest path lengths possible within any car. The resulting symmetry was unique. Then, speaker locations compensated for the natural delays affecting all speakers driven with low-pass signals from a crossover. You see, time delays are more valuable as the system quality decreases. This is why high end home speakers like Wilson Audio's achieve the most three dimensional musical reproduction without digital time compensation. 
photo image of night concert at amphitheater
Thanks to speaker locations, the van's boundaries disappeared when playing music. The stage's width and depth seemed to extend into the horizon. It was like listening to an orchestra in an open amphitheater rather than the usual enclosed theater. In comparison, the best cars at the time sounded like lunch boxes. Without proper speaker alignment, this would have never been possible. But rather than using a patch for the problem, Paul and I eliminated the problem right from the beginning. 
In the end, Paul and I bridged the gap created by a massive ocean that separates our two nations. We brought the best from British and American know-how. We created a vehicle that although American in heritage (it was a Chevy Astro van with a Corvette engine after all), it was very British. The sound system demonstrated a complete lack of fear of innovation. It was quirky as many British masterpieces are. It was as elegant as a James Bond super car. Finally, it created beautiful music as only the Brits know how to. Oh, how I miss that sound!


February 14, 2014 update:

After publishing this article, I received what I thought was a great question from a close friend whom I admire very much: über world champion Ron Baker. I hope that you find our exchange insightful.

Ron Baker:
"Speaking of head units, would you say that the head unit and processor are the more important items in the signal path?  Then, within the head unit, I would suspect that the most important part is the transport. Finally, the processor would do the heavy lifting."

Alberto Lopez:
"Ron, I am not sure that any one part is superior. I think that when we listen to reproduced music, we in fact hear a layered picture made up from the combination of the characteristic sound of all components in the signal chain. Improving one makes the new picture better but it isn't free from the problems of the other parts. 
If my thesis is correct, then it would make sense to try to improve every part of the system. Moreover, it would also suggest that fewer, as opposed to more, system components in the chain should perform much better. Both of these observations are supported by my empirical observations."

Friday, January 10, 2014

Low Stage Part 01 - Two Speakers

photo of a tweeter custom installed over the "A" pillar of a vehicle.
Tweeters on "A" pillars
Is your car audio's sound-stage low? Are you being told to place tweeters on the "A" pillars? Do high highs fix height?
If you have height problems, you are not alone. Most systems have height problems. Unfortunately, just as many are patched with tweeters up high. The argument is that you need speakers at eye level to fix height problems. The pundits further argue that high frequencies are responsible for height. Wow!
photo image of pink Hello Kitty band-aid box
Hello Kitty Band-aid
This reminds me of a time when, standing behind a shameless retail salesperson, I heard him tell a consumer that a woofer needed a port to breath or else die. Can you imagine a woofer being slowly chocked to death every minute of every day, whether being played or not? Clueless!
Needless to say, tweeters placed high don't address the fundamental problem. Instead, such attempts equate to no more than a Hello Kitty Band-aid. They are cute. Let me expand.
I once built an award winning truck that had waveguides underneath the front seats. The horn mouths were located right behind the front passengers' Achilles-heels with the horns firing forward towards the front of the car; where the pedals are located. In other words, they were right over the carpet's floor and aimed away from the listener.
line drawing illustration of car audio waveguides installed under the seat
Waveguides under the seat
But even under this very unusual scenario, there was no problem with either stage height or high frequency loudness. The only problem was that for a few early shows, judges struggled to score the vehicle because there were no visible speakers anywhere. And let me tell you, you never want to baffle judges. You want to impress them instead. And once the word got out that the speakers were horns and that they were being used in such an incredible manner, the scores jumped immediately.
This does not mean that placing a speaker in any one location is a bad thing. It is just that placing them there does not solve the fundamental problems behind the psycho acoustical effect of a lower stage.
To understand the issues at hand and the potential solutions, I will have to cover several aspects of acoustics; more than I would like to do in a single article. I will therefore break it into parts. My goal is to be able to clearly explain one concept at a time.

Not a Point Source
Two Way Second Order Crossover
The fact is that (1) all non-coincident systems deploying multiple drivers exhibit radiation lobes in the vertical plane around the crossover frequency. (2) But these lobes are not aligned with the design's central axis. Instead, a Polar Axis tilt results. This tilt is measured in degrees.

In simpler terms, this means that every time you use two speakers to play the same frequency their combined output will create areas of cancellation (destructive interference) next to areas of cooperation (constructive interference). Moreover, the resulting patterns of interaction are not symmetrical; they tilt more towards one of the speakers.
To visualize these concepts, look at the following illustration.
image of the sound pressure measurement from a two way speaker system with a 2nd order crossover at 2200 Hz
Sound wave measurement for a typical two way system
Two speakers, a tweeter and woofer, are surface mounted above one another as it's commonly done in home speakers. To channel high frequencies to the tweeter and low frequencies to the woofer, a second-order or 12dB/Oct crossover set at 2.2 KHz is used between the two speakers. Measurements of the acoustic pressure waves are then taken at 2.2 KHz. The resulting measurements clearly show two sets of waves; one for the tweeter and one for the woofer. Dark areas represent low pressures while white areas show high pressures.
Now direct your attention to the image below. A listener with his ear placed at the tip of the red arrow would hear most of the 2.2 KHz sound as coming mainly from the tweeter. The sound would be loud and relatively clear depending mostly of the quality of the tweeter. At this point, any attributes of the woofer are less relevant. Again, the white portions of the wave represent high pressure portions of the wave.
image of a listener focusing on a high pressure area of the sound pressure measurement from a two way speaker system
Listener focused on high pressure area

Next, look at the tip of the red arrow below. There, the listener would hear most of the 2.2 KHz sound as coming from the woofer. The dark area represents the low pressure of the wave as it radiates from the speaker. It is important to note that low pressure does not mean that loudness is low. The perceived sound would be just as loud as with the example above. This is because sound is made from two halves; low and high pressure halves. The change between these periodically repeated halves is what we hear. In this case, the quality of the sound would be mostly dependent of the quality of the woofer.
image of a listener focusing on a low pressure area of the sound pressure measurement from a two way speaker system
Listener focused on low pressure area

 Finally, look at the next arrow pointing at the middle area where the two waves interact. A close analysis shows that the tweeter's wave above is at a low pressure stage while the woofer's wave below is at a high pressure stage. Subsequently, the arrow's head is placed over an area of cancellation. In this case, gray means no sound.
image of a listener focusing on the cancelation area of the sound pressure measurement from a two way speaker system
Listener focused on cancellation area

The area between the two waves actually beams outwardly from the speaker and angles down from the center axis. This is a cancellation beam and is highlighted below. A listener on this axis would hear the effect of two waves trying to cancel each other at 2.2 KHz. 
image of an acoustic lobing graphic over a sound pressure measurement from a two way speaker system
Acoustic Pressure and Lobing Graph

This now takes us to the typical dispersion pattern graph as is commonly used by acoustical engineers:
graphical illustration of a lobing pattern resulting from the use of a second order crossover with speakers placed with their acoustical centers four inches from each other

The fundamental problem that all these graphs and images are attempting to illustrate is that the cancellation effects that result from using two speakers distort and destroy any illusion of a realistic sound. As we will see later, this distortion is also behind the height problems experienced by many car guys. 
I will take us deeper on the subject on a future post. Until then, happy listening!


A video showing all components of a two way system:

Monday, January 6, 2014

A Little Gauss: A Calculator & the Law

Playing with coils? Have you ever wondered the strength of a magnetic field at a given frequency? Well, just in case that you need to geek-out, here is a Gauss calculator I have used in the past when playing with coils.

screen shot of an excel document with the formula needed to calculate Gauss
Gauss Calculator for Excel
And what a better way to get to understand a little Gauss Law as it applies to conductors than to watch Professor Ramamurti Shankar from Yale explain it.


And for those who wish to look at it a little closer, then here's the video's transcript:

          830: FUNDAMENTALS OF PHYSICS II
          Lecture 4 - Gauss's Law and Application to Conductors and Insulators [January 20, 2010]
          Chapter 1: Derivation of Gauss's Law [00:00:00]
          Professor Ramamurti Shankar: Let's start with a brief recall of Gauss's Law...  
          (read the rest here)

For the complete course, visit Yale's PHYS 201: Fundamentals of Physics II web page.

Saturday, January 4, 2014

Best Sound in a Vehicle

Can I brag? How much? Can I brag a lot? Is it bragging if performance is evidenced by the facts and certified by experts?
These are two videos of the best and last installation I did. Working with British super star Paul Richardson, this was my farewell from the installation bay. And it all ended with a massive bang. Paul and I cleaned house.
But now, all that's left is the memory of it. As melancholy travels through my soul, I am trying to reconstruct what can no longer exist through this blog post. I know that I will never again hear the van's incredible sound. But be certain that, at least in my mind, I will replay the songs I remember.
I also know that we tend to idealize what's not material or tactile anymore. But I am fine with an enhanced delusion of what the van was. During its time, nothing came anywhere close to it. Not on install. And especially not on sound.
As a well regarded sound judge who has continued to audition and evaluate the best cars out there, I am allowed to claim that this van was the best ever. Surely there were some fantastic cars like Gary Bigg's many versions of his stupendous Regal, Chad Klodner's majestic Mustang and many others. But I will hold my ground. The ginormous stage made one feel like being seated in the middle of Royal Festival Hall in London. The musical clarity defied even the best home systems. And oh, the low noise. The system was eerily quiet during all musical playback. Textures were delicious and tonality rode right on the line between too sweet and precise. Finally, the psycho-acoustics possible were incredible. Turning the head towards the rear would completely collapse the sense of space. Turning back towards the front would be like launching the Titanic a few feet from your face. It was most certainly a visceral experience. You would forget that you were within a space.
I am afraid that nothing I say will make justice to its performance. So, I will regress to the point of this post. Sharing the videos. The first video offers a short tour of the installation.

The second presents the installation book created for the van. Do keep in mind that in those years, computers did little more than act as typewriters.

For those who like to click through dozens of images, these are the scans from each page: